

ページネーションに省略機能を付ける(Next.js)

記事数が増えてきてページネーションこのままだと表示崩れが起きてしまいそうだったので省略機能を追加する
改修前のページネーション
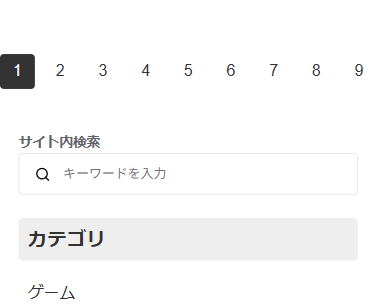
スマホ表示にすると画面いっぱいになってしまっている。当時実装した際のコードは以下の通り
import { NEWS_LIST_LIMIT } from "@/app/_constants";
import Link from "next/link";
import styles from "./index.module.css";

type Props = {
  totalCount: number;
  current?: number;
  basePath?: string;
};

export default function Pagenation({
  totalCount,
  current = 1,
  basePath = "/blog",
}: Props) {
  const pages = Array.from(
    { length: Math.ceil(totalCount / NEWS_LIST_LIMIT) },
    (_, i) => i + 1
  );

  return (
    <nav>
      <ul className={styles.container}>
        {pages.map((p) => (
          <li className={styles.list} key={p}>
            {current !== p ? (
              <Link href={`${basePath}/p/${p}`} className={styles.item}>
                {p}
              </Link>
            ) : (
              <span
                className={`${styles.item}
              ${styles.current}`}
              >
                {p}
              </span>
            )}
          </li>
        ))}
      </ul>
    </nav>
  );
}
ページネーションコンポーネントの改修
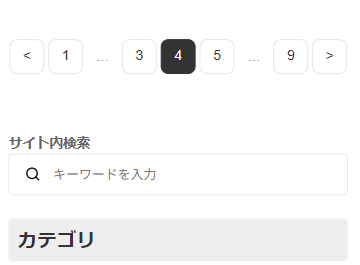
今回、表示崩れが起きないようにページネーションコンポーネントに省略機能を追加した。最終的な仕上がりのイメージとコードは以下の通り。主な変更点として、省略時は「...」と表示していることと、次へボタン「>」と、戻るボタン「<」を追加している。これでページネーションも使いやすくなったはずだ。
import { NEWS_LIST_LIMIT } from "@/app/_constants";
import Link from "next/link";
import styles from "./index.module.css";
type Props = {
totalCount: number;
current?: number;
basePath?: string;
};
export default function Pagination({
totalCount,
current = 1,
basePath = "/blog",
}: Props) {
const totalPages = Math.ceil(totalCount / NEWS_LIST_LIMIT);
if (totalPages <= 1) return null; // 1ページしかない場合は表示しない
const getVisiblePages = () => {
const range = 1;
const pages: (number | string)[] = [];
for (let i = 1; i <= totalPages; i++) {
if (
i === 1 ||
i === totalPages ||
(i >= current - range && i <= current + range)
) {
pages.push(i);
} else if (pages[pages.length - 1] !== "...") {
pages.push("...");
}
}
return pages;
};
return (
<nav className={styles.nav}>
<ul className={styles.container}>
{/* 前へボタン */}
{current > 1 && (
<li className={styles.list}>
<Link
href={`${basePath}/p/${current - 1}`}
className={styles.arrow}
>
<
</Link>
</li>
)}
{getVisiblePages().map((p, index) => (
<li className={styles.list} key={index}>
{typeof p === "number" ? (
<Link
href={`${basePath}/p/${p}`}
className={`${styles.item} ${current === p ? styles.current : ""}`}
>
{p}
</Link>
) : (
<span className={styles.ellipsis}>{p}</span>
)}
</li>
))}
{/* 次へボタン */}
{current < totalPages && (
<li className={styles.list}>
<Link
href={`${basePath}/p/${current + 1}`}
className={styles.arrow}
>
>
</Link>
</li>
)}
</ul>
</nav>
);
}.nav {
display: flex;
justify-content: center;
margin: 40px 0;
}
.container {
display: flex;
align-items: center;
gap: 8px;
padding: 0;
list-style: none;
}
.item,
.arrow {
display: flex;
justify-content: center;
align-items: center;
width: 40px;
height: 40px;
border-radius: 8px;
border: 1px solid #e5e5e5;
background-color: #fff;
color: #333;
text-decoration: none;
font-size: 14px;
font-weight: 500;
transition: all 0.2s ease;
}
.item:hover,
.arrow:hover {
border-color: #333;
background-color: #f9f9f9;
}
.current {
background-color: #333;
color: #fff;
border-color: #333;
pointer-events: none;
}
.ellipsis {
display: flex;
align-items: center;
justify-content: center;
width: 32px;
color: #999;
}
@media (max-width: 480px) {
.container {
gap: 4px;
}
.item,
.arrow {
width: 36px;
height: 36px;
}
}まとめ
今回、Next.jsで作成しているブログのページネーションに省略機能を追加してみた。もしページネーションを作ろうとしている方がいれば参考になれば幸いだ。

Next.js+ヘッドレスCMSではじめる! かんたんモダンWebサイト制作入門 高速で、安全で、運用しやすいサイトのつくりかた
\ この記事をシェアする /



この記事を書いた人

もなか
Web制作で学んだことApple、スマホ関連のニュース、日常のつぶやきをまとめています。お気軽にフォローしてください。



.png)
.png)
.png)
.png)