.png&w=3840&q=75)
Next.jsでタグ機能を作る
microCMS+Next.jsで運用しているブログにタグ機能を追加したときの備忘録。タグ機能の実装を検討している方の参考になれば嬉しい。
APIの作成
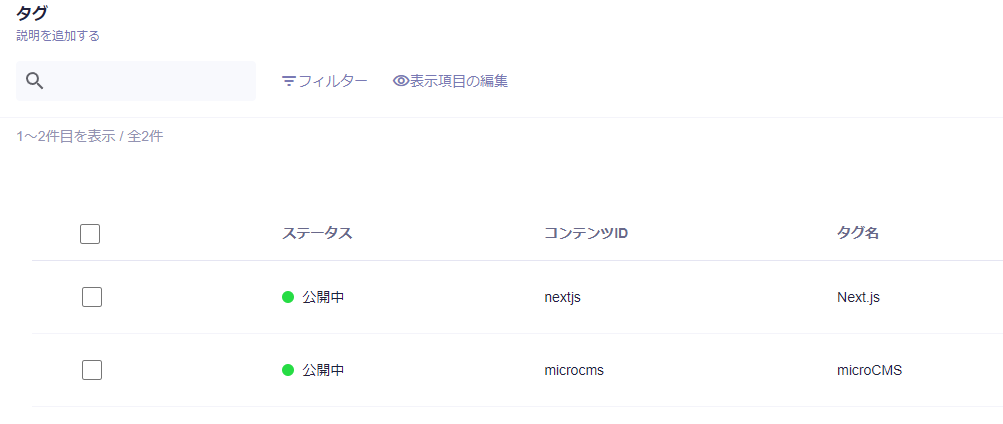
まずmicroCMS側でコンテンツ(API)の作成を行った。今回は取り急ぎ2つタグを設定した。コンテンツIDとタグ名にはわかりやすいものを入力する

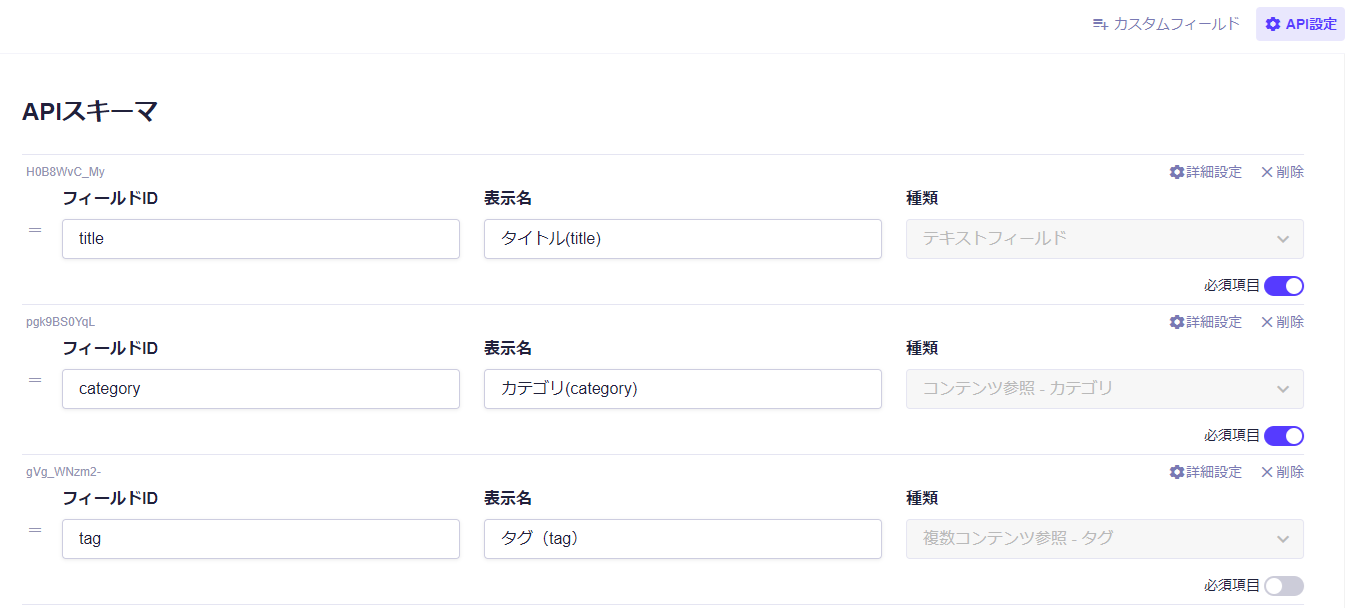
次に記事のAPI側で参照できるようにAPI設定を追加した。自分の場合、フィールドIDはtag、種類は複数コンテンツ参照にした。

Tagデータの取得
あらかじめいくつかのコンテンツにタグの情報を入稿したら、データを取得できるように準備を進めます。「microcms.ts」ファイルの末尾に以下を追加した
export type Tag = {
  name: string;
} & MicroCMSListContent;

export type News = {
  title: string;
  description: string;
  content: string;
  thumbnail?: MicroCMSImage;
  category: Category;
  tag: Tag[]; // ここを追加。タグは複数選択することがあるため
} & MicroCMSListContent;

(中略)

// Tag
export const getTagDetail = async (
  contentId: string,
  queries?: MicroCMSQueries
) => {
  const detailData = await client.getListDetail<Tag>({
    endpoint: "tag",
    contentId,
    queries,
  });

  return detailData;
};

export const getAllTagList = async () => {
  const listData = await client.getAllContents<Tag>({
    endpoint: "tag",
  });

  return listData;
};
Tagコンポーネントの作成
次にタグコンポーネントを作成した。「_compornents」ディレクトリ配下に「Tag」ディレクトリを作成し、その中にindex.tsxとindex.module.cssを作成する
import type { Tag } from "@/app/_libs/microcms"; // Tag型をインポート
import style from "./index.module.css";

type Props = {
  tags: Tag[]; // タグの配列をTag型に変更
};

export default function Tag({ tags }: Props) {
  // tagsが存在しない場合は何も表示しない
  if (!Array.isArray(tags) || tags.length === 0) {
    return null;
  }

  return (
    <ul className={style.tagContainer}>
      {tags.map((tag) => (
        <li key={tag.id} className={style.tag}>
          {tag.name}
        </li>
      ))}
    </ul>
  );
}
.tag {
color: #331cbf;
display: inline-flex; /* インライン要素のように表示し、アイコンとテキストを横並びにする */
align-items: center; /* 垂直方向に中央揃え */
font-size: 16px;
margin-right: 20px;
}
.tag:before {
background: url(/icon_tag.svg) 50% no-repeat;
background-size: contain;
content: "";
display: inline-block;
height: 16px;
width: 16px;
margin-right: 8px; /* アイコンとテキストの間に余白を作る */
}Tagページ(一覧ぺージ)の作成
次にタグを選択した後の記事一覧ページを作成していく。自分は記事を/blog/配下に作成している適宜読み替えて作成すること。以下のようにディレクトリ、page.tsxを作成した。
app/
└── blog/
    └── tag/
        └── [id]/
            └── page.tsx
            └── p/
                └── [current]/
                    └── page.tsx
2つのpage.tsxを作成していく。まずは「app\blog\tag\[id]\page.tsx」は以下のようにした。
import { getTagDetail, getNewsList } from "@/app/_libs/microcms";
import NewsList from "@/app/_components/NewsList";
import { notFound } from "next/navigation";
import Tag from "@/app/_components/Tag";
import { NEWS_LIST_LIMIT } from "@/app/_constants";
import Pagenation from "@/app/_components/Pagenation";

export const runtime = "edge";

type Props = {
  params: {
    id: string;
  };
};

export default async function Page({ params }: Props) {
  const tag = await getTagDetail(params.id).catch(notFound);
  const { contents: news, totalCount } = await getNewsList({
    limit: NEWS_LIST_LIMIT,
    filters: `tag[contains]${tag.id}`,
  });

  return (
    <>
      <Tag tags={[tag]} />
      <NewsList news={news} />
      <Pagenation totalCount={totalCount} basePath={`/blog/tag/${tag.id}`} />
    </>
  );
}
続いて「app\blog\category\[id]\p\[current]\page.tsx」は以下のようにまとめた
import { notFound } from "next/navigation";
import { getCategoryDetail, getNewsList } from "@/app/_libs/microcms";
import NewsList from "@/app/_components/NewsList";
import Pagenation from "@/app/_components/Pagenation";
import { NEWS_LIST_LIMIT } from "@/app/_constants";

export const runtime = "edge";

type Props = {
  params: {
    id: string;
    current: string;
  };
};

export default async function Page({ params }: Props) {
  const current = parseInt(params.current as string, 10);

  if (Number.isNaN(current) || current < 1) {
    notFound();
  }

  const category = await getCategoryDetail(params.id).catch(notFound);

  const { contents: news, totalCount } = await getNewsList({
    filters: `category[equals]${category.id}`,
    limit: NEWS_LIST_LIMIT,
    offset: NEWS_LIST_LIMIT * (current - 1),
  });

  if (news.length === 0) {
    notFound();
  }

  return (
    <>
      <NewsList news={news} />
      <Pagenation
        totalCount={totalCount}
        current={current}
        basePath={`/blog/category/${category.id}`}
      />
    </>
  );
}
articleコンポーネントで呼び出す
最後にarticleコンポーネントで呼び出してあげればOK。リンクも設定しておく
        {data.tag && data.tag.length > 0 && (
          <div className={styles.tagLinks}>
            {data.tag.map((tag) => (
              <Link
                key={tag.id}
                href={`/blog/tag/${tag.id}`}
                className={styles.tagLink}
              >
                <Tag tags={[tag]} />
              </Link>
まとめ
今までで一番苦労したかもしれない。作るページが多かったのと、categoryを作るのとはちょっとやり方が異なったりして苦戦した。最終的にはmicroCMSブログに近い形で実装できたので満足だ。次も機能の追加を頑張りたい

Next.js+ヘッドレスCMSではじめる! かんたんモダンWebサイト制作入門 高速で、安全で、運用しやすいサイトのつくりかた
.png&w=3840&q=75)
.png&w=3840&q=75)
.png&w=3840&q=75)